
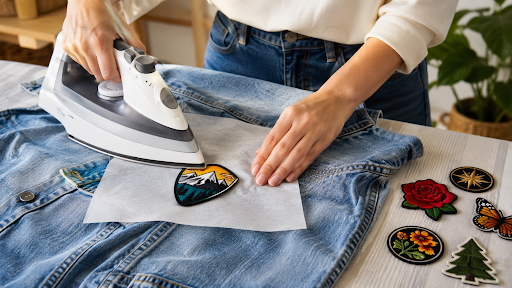
Iron-on patches are an easy way to refresh an old jacket, personalize a backpack, cover a small tear, or give plain clothing a little more character. The process looks simple: place the patch, heat the iron, and press. However, using the wrong temperature or holding the iron in one spot for too long can leave shiny marks, melted fibers, discoloration, or permanent scorch damage.
The safest approach is not to use as much heat as possible. It is to match the heat setting to the fabric, protect the surface with a pressing cloth, and give the adhesive enough time to bond without overheating the garment.
Different fabrics react to heat in different ways. Denim and cotton can usually tolerate higher temperatures, while polyester, nylon, silk, leather, and coated materials need much more care. Before applying any patch, check both the garment instructions and the directions provided with the patch.
How to Iron On Patches Without Damaging Your Clothes
To iron on patches without damaging your clothes, begin by checking the garment’s care label. Make sure the fabric can safely handle heat, then select a suitable iron temperature and turn off the steam setting.
Place the patch adhesive-side down, cover it with a thin cotton cloth, and press the iron firmly instead of moving it back and forth. Apply heat for short intervals, allow the patch to cool, and check the edges before adding more heat.
This careful method helps protect the fabric while giving the adhesive enough warmth and pressure to create a strong bond.
Check the Clothing Care Label First
The care label is the best place to start because it tells you whether the garment can be ironed and how much heat it can handle.
Look for the iron symbol on the label. Dots inside the symbol usually indicate the recommended temperature. One dot suggests low heat, two dots indicate medium heat, and three dots mean the fabric can generally tolerate a higher setting. A crossed-out iron means the garment should not be ironed.
Be especially careful with:
- Polyester
- Nylon
- Silk
- Leather and faux leather
- Waterproof clothing
- Coated fabrics
- Stretch materials
- Garments with plastic details
If the label says “do not iron,” do not try to force the patch to stick with heat. Sewing the patch or using a clothing-safe fabric adhesive may be a better option.
When you are unsure, test the iron on a hidden section of the garment. The inside of a hem or seam allowance is often a suitable place. If the fabric becomes shiny, changes color, wrinkles, or feels stiff, reduce the temperature or avoid heat completely.
Make Sure the Patch Is Actually Iron-On
Not every embroidered patch has a heat-activated backing. Before heating anything, check whether the patch is iron-on or sew-on.
An iron-on patch normally has a smooth, slightly glossy adhesive layer on the back. It may feel stiff or look like a thin coating of plastic. A sew-on patch usually has a plain fabric backing without a shiny adhesive surface.
The packaging should clearly state how the patch is meant to be attached. If there are no instructions and the backing does not appear to contain adhesive, treat it as a sew-on patch.
Trying to iron a patch without an adhesive backing will not make it stick. It may also damage the embroidery or leave marks on the clothing.
What You Need Before Applying an Iron-On Patch
Preparing your supplies before you start makes the process easier and helps prevent rushed mistakes.
You will need:
- An iron-on patch
- A clean and completely dry garment
- A household iron
- A sturdy ironing board or heat-resistant surface
- A thin cotton cloth, pillowcase, or pressing cloth
- Parchment paper, when recommended by the patch manufacturer
- A folded towel for uneven areas
- A timer or phone clock
A pressing cloth is one of the most important items on the list. It creates a barrier between the iron and the patch, reducing the risk of scorching, shine, melted thread, or damage to printed details.
Choose a light cotton cloth rather than a thick towel. A very heavy layer may block too much heat and prevent the adhesive from activating properly.
Prepare the Garment and Patch
Good preparation can make the difference between a patch that stays in place and one that starts peeling after the first wash.
Wash and Dry the Clothing
Apply patches only to clean, dry fabric. Dirt, body oils, dust, moisture, and laundry products can prevent the adhesive from bonding evenly.
Wash the garment according to its care instructions, then allow it to dry completely. Avoid using fabric softener immediately before attaching the patch. Fabric softener can leave a light coating on the fibers, making it harder for the adhesive to grip the material.
New clothing should also be washed first when possible. Washing can remove finishes left over from manufacturing and allow the garment to complete any initial shrinking before the patch is attached.
Choose the Best Placement
Lay the garment flat and position the patch before turning on the iron. Avoid rushing this step because the patch may be difficult to reposition once the adhesive begins to melt.
Try on the garment if you are placing the patch on a jacket, shirt, or pair of jeans. A patch that looks centered while the clothing is flat may appear slightly off when worn.
For a cleaner and stronger application:
- Avoid thick seams and raised stitching
- Keep the patch away from zippers and buttons
- Do not place it over deep folds or pleats
- Avoid areas that stretch heavily
- Stay away from waterproof panels or plastic decorations
- Arrange all patches before attaching the first one
When applying several patches, take a photo of the layout. You can refer to the picture if any pieces shift while you work.
Flatten the Fabric
Wrinkles and folds can stop the adhesive from touching the fabric evenly. Before positioning the patch, smooth the garment and briefly iron the area using a temperature that is safe for the material.
Let the fabric cool for a few seconds, then place the patch adhesive-side down.
What Temperature Should You Use for Iron-On Patches?
There is no universal temperature that works for every patch and every garment. The right setting depends on the fabric, the adhesive backing, and the manufacturer’s directions.
Always follow the lower heat recommendation when the patch instructions and garment label suggest different settings. Protecting the clothing is more important than forcing the adhesive to melt quickly.
Recommended Heat Settings by Fabric
Cotton: Cotton usually handles medium-high or high heat well. A pressing cloth is still recommended, especially on dark-colored clothing that may develop shiny marks.
Denim: Denim is one of the easiest fabrics for iron-on patches. It can often tolerate medium-high to high heat and firm pressure. Thick denim may require slightly longer pressing.
Canvas: Canvas generally responds well to medium-high heat. It is a popular material for patches on tote bags, workwear, and backpacks.
Polyester: Use low to medium heat when learning how to iron on patches to polyester safely. High temperatures can melt the fibers, create shine, or cause the fabric to warp.
Nylon: Nylon is sensitive to heat and may melt quickly. Many nylon garments and bags are not suitable for standard iron-on patch application.
Silk: Silk can scorch, discolor, or develop water and heat marks. Sewing is usually a safer choice.
Leather and faux leather: A household iron can dry out, crack, melt, or discolor these materials. Use stitching, a suitable adhesive, or professional help instead.
Should You Use Steam?
In most cases, the steam setting should be turned off. Iron-on patch adhesive is activated by dry heat and pressure. Moisture can reduce the strength of the bond or stop the adhesive from heating evenly.
Empty the water reservoir if your iron tends to release steam unexpectedly. Make sure the soleplate is clean before pressing the garment.
Step-by-Step Instructions for Ironing On a Patch Safely
Step 1: Heat the Iron
Set the iron to the correct temperature for the garment. Turn off the steam function and let the iron heat fully.
Do not automatically choose the highest setting. Starting with moderate heat and adding a few more seconds when necessary is much safer than overheating the fabric.
Step 2: Warm the Fabric
Press the area where the patch will sit for about five seconds. This removes remaining wrinkles and gently warms the fibers.
Do not use steam. The fabric should remain completely dry.
Step 3: Position the Patch
Place the patch with the adhesive side facing the garment. Adjust it until it is straight and positioned exactly where you want it.
Once the patch is in place, avoid moving the garment. For small patches, a tiny piece of heat-resistant tape may help prevent shifting, but make sure the tape is safe for the fabric.
Step 4: Cover the Patch
Place a pressing cloth, thin pillowcase, or piece of cotton fabric over the patch. The entire patch should be covered.
This protective layer helps prevent direct contact between the iron and any embroidery, plastic coating, decorative thread, or printed design.
Step 5: Press Instead of Sliding
Place the iron directly over the covered patch and press down firmly. Do not move the iron back and forth as you would when removing wrinkles.
Sliding can shift the patch and spread the adhesive unevenly. It may also wrinkle the garment underneath.
Use steady downward pressure for the amount of time recommended by the patch manufacturer.
Step 6: Heat the Back of the Garment
When possible, turn the garment inside out and press the reverse side of the patched area. Place the pressing cloth between the iron and the fabric before applying heat.
Heating from the back helps activate the adhesive without exposing the front of the patch to additional direct heat. This is particularly useful for thick embroidered patches.
Step 7: Let the Patch Cool
Lay the garment flat and leave the patch untouched until it has cooled completely.
Do not bend the fabric, pull at the edges, or wear the garment while the adhesive is still warm. The bond continues to set during cooling, and moving the patch too soon may cause it to lift.
How Long Should You Iron On a Patch?
Most iron-on patches need about 15 to 30 seconds of firm pressure, although the exact time can vary.
Thin patches on lightweight cotton may bond quickly. Thick embroidered patches, denim, and canvas may need slightly more time. Polyester and other heat-sensitive fabrics should be pressed in shorter intervals.
A safer approach is to start with the shortest recommended time, allow the patch to cool slightly, and check the edges. If an edge is loose, cover it again and apply heat for another five to ten seconds.
Avoid holding the iron in one place for an excessive amount of time. More heat does not always create a stronger bond. It can burn the fabric, melt synthetic fibers, damage embroidery, or cause adhesive to leak around the patch.
How to Iron On Patches to Different Types of Clothing
How to Iron On Patches to Denim Jackets and Jeans
Denim is one of the most patch-friendly materials because it is thick, sturdy, and usually able to tolerate higher heat.
Place the jacket or jeans on a firm surface and avoid positioning the patch directly over a thick seam. Use a medium-high setting, cover the patch, and press firmly. Heating the reverse side can help the adhesive reach the dense fibers.
Patches on knees, elbows, pockets, and other high-friction areas may eventually loosen. Adding a few stitches around the border can make them last longer.
How to Iron On Patches to Cotton Shirts
Cotton shirts normally work well with iron-on patches, but lightweight fabric can wrinkle or stretch during application.
Lay the shirt flat without pulling it. Use a medium or medium-high temperature based on the care label. Place a pressing cloth over the patch and press without sliding.
Keep in mind that a heavy patch may pull on a thin T-shirt. Small, lightweight patches are usually a better choice for soft cotton tops.
How to Iron On Patches to Polyester Safely
Polyester requires more caution than cotton or denim because too much heat can melt the fibers or leave a glossy mark.
Use a low or medium iron setting and test a hidden area first. Always use a pressing cloth and work in short intervals rather than applying continuous heat.
If the adhesive does not activate at a safe temperature, do not keep increasing the heat. Sewing the patch is a better option than risking permanent damage to the garment.
How to Attach Patches to Backpacks and Canvas Bags
Canvas bags are generally suitable for iron-on patches, but backpacks may contain several different materials. The outer fabric might be canvas or polyester, while the inside may include plastic coating, foam padding, or waterproof lining.
Check the label and inspect both sides of the area before using an iron. Place a folded towel inside the bag to create a flat, firm surface.
Avoid ironing over zippers, straps, buckles, padded sections, and plastic panels.
Can You Iron Patches Onto Hats, Caps, or Leather?
Hats and caps are difficult because their curved shape makes it hard to apply even pressure. A small craft iron may be more practical, although stitching is often the most secure option.
Leather and faux leather should not normally be treated with a household iron. Genuine leather may dry out, harden, or discolor, while faux leather can melt or peel. A tailor can attach the patch with stitching without exposing the material to damaging heat.
Common Mistakes That Can Damage Clothes or Patches
Many failed applications happen because the process is rushed. Avoid these common mistakes:
- Using the highest heat setting without checking the label
- Leaving the steam function on
- Pressing the iron directly onto the patch
- Sliding the iron back and forth
- Applying the patch over a seam
- Working with damp or dirty clothing
- Moving the garment before the adhesive cools
- Washing the item immediately after application
- Reheating delicate fabric repeatedly
- Ignoring the instructions included with the patch
Another common mistake is testing the bond while the patch is still hot. Pulling on warm adhesive can weaken it. Let the area cool before gently checking the edges.
Why Is My Iron-On Patch Not Sticking?
An iron-on patch may not stick because the iron was too cool, the pressure was uneven, the fabric was damp, or the adhesive did not make full contact with the surface.
Fabric softener, waterproof coatings, dirt, and old adhesive can also cause problems. In some cases, the garment simply cannot tolerate enough heat to activate the glue.
How to Fix an Iron-On Patch That Is Peeling Off
If the edges begin lifting, place the garment on a firm surface and cover the patch with a pressing cloth. Reheat it for a short period while applying steady pressure.
Turn the garment inside out and press the reverse side when the fabric allows it. Let the patch cool completely before checking the bond.
If it continues to peel, add a few small stitches around the edge. This is often the safest fix for polyester, frequently washed clothing, and patches placed in high-friction areas.
Do not repeatedly increase the temperature. A patch that refuses to stick is less costly than a permanently melted garment.
How to Make Iron-On Patches Stay On Longer
Correct application is important, but ongoing care also affects how long the patch lasts.
To improve durability:
- Apply patches to clean, dry fabric
- Use the recommended temperature
- Apply firm, even pressure
- Heat both sides when safe
- Allow the adhesive to cool fully
- Wait before washing the garment
- Avoid placing patches on highly flexible areas
- Stitch around the edges for added security
Iron-on patches attached to workwear, children’s clothing, school bags, and jeans are exposed to frequent movement and washing. Sewing the border can prevent early peeling.
Can You Wash Clothes With Iron-On Patches?
Most clothing with iron-on patches can be washed, but gentle care will help protect the adhesive.
Wait at least 24 to 48 hours before the first wash. This gives the adhesive time to settle and form a stronger bond.
Turn the garment inside out and wash it in cold or lukewarm water on a gentle cycle. Avoid harsh bleach, strong stain removers, and aggressive scrubbing around the patch.
Air-drying is usually the safest choice. High dryer temperatures can soften the adhesive and cause the edges to lift. When machine drying is necessary, use a low setting and follow the garment’s care instructions.
Do not iron directly over the patch after washing. Cover it with a pressing cloth if it needs to be flattened.
Can You Apply an Iron-On Patch Without an Iron?
A heat press can apply more even heat and pressure than a household iron, making it useful for large patches or repeated projects. However, the settings must still be suitable for the fabric.
A hair straightener may work on very small patches or narrow edges, but it is difficult to control the temperature and pressure. Uneven heating can damage the patch or create a weak bond.
Safer alternatives include:
- Sewing by hand
- Using a sewing machine
- Applying fabric adhesive made for clothing
- Combining adhesive with stitching
- Asking a tailor to attach the patch
Avoid using open flames, cooking equipment, or other improvised heat sources. They are difficult to control and can create a serious risk of burns or fire.
Should You Sew an Iron-On Patch After Applying It?
You do not always need to sew an iron-on patch, especially when it is placed on a sturdy garment that is not washed often. However, stitching adds extra strength and can prevent the border from lifting over time.
Sewing is especially useful for:
- Denim jackets and jeans
- Backpacks and school bags
- Work uniforms
- Children’s clothing
- Frequently washed garments
- Patches placed near elbows, knees, or pockets
A simple line of matching thread around the border is usually enough. It keeps the patch secure while still allowing the adhesive to hold the center flat.
Before wearing the garment, check that the patch is fully cool and that all edges are attached. Use moderate heat, a protective cloth, and short pressing intervals whenever extra heat is needed. A patient application is far safer than trying to repair scorched fabric, melted polyester, or a damaged patch.