
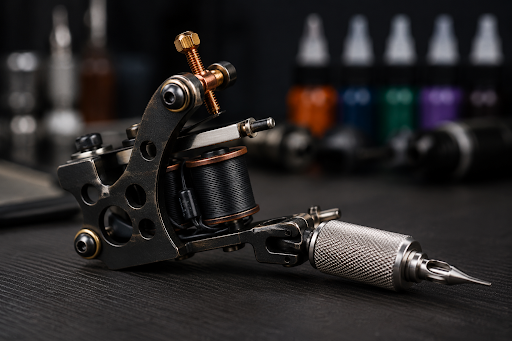
That unmistakable buzzing sound in a traditional tattoo studio usually comes from a coil tattoo machine. Long before rotary pens became common, coil machines were the standard choice for tattoo artists around the world. They are still widely used today, especially by artists who value strong needle movement, detailed mechanical control, and the classic feel of traditional tattoo equipment.
At first glance, a coil machine can look complicated. It has visible springs, screws, coils, wires, and moving metal parts. However, its basic operation is easier to understand once you see how those parts work together.
This guide explains how a coil tattoo machine operates, what its main components do, how liner and shader machines differ, and why many professional artists continue to use them.
What Is a Coil Tattoo Machine and How Does It Work?
A coil tattoo machine is an electromagnetic device that moves a tattoo needle rapidly up and down. This movement allows the needle to carry ink into the skin in a controlled way.
The machine receives electrical power from a tattoo power supply. When electricity flows through its coils, they become temporary magnets. These magnets pull down a metal component called the armature bar. Because the tattoo needle is connected to the armature bar through a needle bar, it moves downward at the same time.
As the armature bar moves, it breaks the electrical connection at the contact screw. The coils then lose their magnetic force, and the springs pull the armature bar back to its starting position. The electrical connection is restored, and the entire process begins again.
This cycle happens many times per second:
- Electricity enters the machine.
- The coils create a magnetic field.
- The armature bar moves downward.
- The needle enters the skin.
- The electrical circuit breaks.
- The springs return the armature bar.
- The circuit reconnects.
The rapid opening and closing of this circuit creates the familiar buzzing noise associated with coil tattoo machines.
Coil Tattoo Machine Parts and Their Functions
Understanding the main components makes it much easier to identify performance issues, tune the machine, and choose the right setup.
The Frame
The frame acts as the body of the machine. It holds the coils, springs, armature bar, contact screw, and other components in position.
Frames can be made from materials such as iron, steel, brass, aluminum, or combinations of different metals. The material affects the weight, balance, durability, and feel of the machine.
Some tattoo artists prefer a heavier frame because it feels stable in the hand. Others choose a lighter model to reduce fatigue during longer sessions.
Electromagnetic Coils
The coils are wrapped copper wires positioned around metal cores. When electrical current passes through them, they produce the magnetic force that pulls the armature bar down.
A common beginner question is: How many wraps should a coil tattoo machine have?
Coil machines are often made with 8-wrap, 10-wrap, or 12-wrap coils. The wrap count refers to the number of layers of wire around the coil core. More wraps do not automatically make a machine better. Coil size, wire quality, frame design, spring tension, and overall tuning all influence performance.
Eight-wrap coils may work well in lighter machines, while 10-wrap and 12-wrap coils are often chosen when an artist wants more pulling power.
Armature Bar
The armature bar is the moving metal bar located above the coils. When the coils become magnetic, they pull the bar downward. When the magnetic field disappears, the springs return it to its original position.
The weight and length of the armature bar influence the speed, stroke, and force of the machine. A heavier armature bar may create a stronger hit, while a lighter one can help the machine run faster.
Front and Back Springs
The springs control how the armature bar moves and returns.
The back spring provides tension and helps lift the armature bar after each downward movement. The front spring works with the contact screw to complete and break the electrical circuit.
Spring thickness, length, angle, and tension can all affect how the machine performs. Worn, bent, or incorrectly installed springs may cause weak movement, inconsistent speed, overheating, or difficulty starting.
Contact Screw
The contact screw touches the front spring and completes the electrical circuit. When the armature bar moves down, the front spring separates from the contact screw, interrupting the current.
Its position affects the machine’s timing, speed, and stroke. Even a small contact screw adjustment can noticeably change the way a coil machine sounds and feels.
Needle Bar and Tube
The needle bar connects the tattoo needle to the armature bar. A small grommet is usually placed between them to keep the connection secure.
The tube and grip guide the needle while giving the artist a stable area to hold. Depending on the setup, artists may use reusable tubes that require proper sterilization or single-use disposable tubes.
How Electromagnetism Powers the Machine
The operation of a coil machine depends on a simple electrical principle: current flowing through a coil of wire can create a magnetic field.
When the foot pedal activates the power supply, electricity travels through the machine. The coils become magnetized and pull the armature bar toward them. That movement drives the needle downward.
The movement also separates the front spring from the contact screw. Once that connection breaks, electricity stops flowing through the coils, and their magnetic pull disappears. The springs then lift the armature bar back up until the front spring touches the contact screw again.
The process repeats as long as the circuit remains active.
Small changes to the machine can affect:
- Needle speed
- Stroke length
- Needle force
- Machine sound
- Vibration
- Heat buildup
- Overall smoothness
This adjustability is one of the main reasons experienced artists enjoy working with coil machines.
Liner vs Shader Coil Tattoo Machines
Although liner and shader machines use the same basic electromagnetic system, they are usually tuned differently.
Coil Tattoo Machine for Lining
A liner is generally set to run faster with a shorter and more responsive movement. Its purpose is to place clean lines into the skin efficiently before ink has time to spread or the artist’s hand moves away from the intended path.
Artists researching how to tune a coil tattoo machine for solid lines should understand that good lining depends on more than speed. Spring tension, needle grouping, armature bar weight, stroke length, hand speed, and voltage must work together.
There is no single best voltage for a coil tattoo machine used for lining. A setting that works well for one machine could make another run too aggressively or too weakly. Artists normally begin with a controlled setting and make small adjustments based on the machine’s sound, needle movement, and response.
Coil Tattoo Machine for Shading
A shader is often tuned to run more slowly with a longer and softer stroke. This gives the artist more time to build smooth gradients, pack color, or cover a larger area without creating a harsh effect.
Shader machines may use different springs, a heavier armature bar, or a wider contact gap than liners.
Some professionals keep separate machines ready for lining and shading. Others adjust one machine for different tasks, although changing the setup during a session can take additional time.
Coil Tattoo Machine Setup for Beginners
A proper coil tattoo machine setup for beginners starts with learning what each component does. Randomly turning screws or bending springs can make the machine run worse and may damage its parts.
A typical setup involves:
- Connecting the machine to a compatible power supply.
- Attaching the clip cord or appropriate power connection.
- Installing the tube and grip.
- Placing the needle or needle bar into the tube.
- Connecting the needle bar to the armature bar with a grommet.
- Using rubber bands, when required, to stabilize side-to-side movement.
- Checking the contact screw position.
- Setting a safe and controlled needle depth.
- Testing the machine before beginning any procedure.
The machine should produce an even sound and consistent armature bar movement. It should not cut out unexpectedly, vibrate uncontrollably, spark heavily, or become hot within a short period.
Tattoo equipment should only be used with proper professional training and strict infection-control practices. Disposable barriers, sterile components, skin preparation, sharps disposal, and local health regulations are just as important as the machine setup itself.
How to Tune a Coil Tattoo Machine
Tuning means adjusting the machine so its speed, stroke, and force match the task the artist wants to perform.
Adjust the Contact Screw Carefully
Moving the contact screw changes the point where the electrical circuit opens and closes. Large adjustments can dramatically affect machine timing, so it is better to make small changes and test the result.
The contact point should also be clean. Carbon buildup or surface damage can interfere with electrical flow and cause inconsistent performance.
Check the Spring Tension
Front and back springs should be properly aligned and free from cracks, bends, or excessive wear. A weak spring may not return the armature bar quickly enough, while too much tension can place unnecessary strain on the machine.
Replacing a worn spring is often more effective than repeatedly trying to compensate through contact screw or voltage adjustments.
Choose the Voltage Based on the Machine
The best voltage for a coil tattoo machine depends on its construction and tuning. It also depends on the needle grouping, power supply, intended technique, and the artist’s working speed.
Increasing voltage is not always the best way to make a weak machine perform better. If the machine only runs correctly at unusually high power, there may be a problem with its springs, contact points, wiring, coil alignment, or mechanical setup.
Test the Machine’s Movement
When learning how to make a coil tattoo machine run smoother, check for:
- A steady, even sound
- Consistent armature bar movement
- Reliable needle return
- Controlled vibration
- Clean contact points
- Secure wires and screws
- Minimal heat buildup
- Properly aligned springs
A machine that sounds uneven or changes speed without adjustment should be inspected before use.
Common Coil Tattoo Machine Problems
Coil machines give artists plenty of control, but their mechanical and electrical parts require regular attention.
Why Is My Coil Tattoo Machine Not Working?
When someone asks, “Why is my coil tattoo machine not working?”, the cause is often a simple connection or adjustment issue.
Possible causes include:
- A loose clip cord
- A damaged power cable
- A faulty foot pedal
- An incompatible or malfunctioning power supply
- Dirty contact points
- An incorrectly positioned contact screw
- Loose wiring
- Damaged coils
- Weak or broken springs
- Poor needle-bar alignment
Testing one component at a time is usually better than changing several settings at once.
Excessive Sparking
A small amount of sparking may sometimes appear at the contact point. However, strong or constant sparking can be a sign of dirty contacts, poor alignment, damaged surfaces, incorrect spring tension, or excessive voltage.
The machine should be switched off and inspected if the sparking appears unusual.
Overheating
A coil tattoo machine can become warm during use, but rapid or excessive overheating should not be ignored.
Possible causes include:
- Voltage that is too high
- Poor coil alignment
- Damaged coil insulation
- Incorrect spring tension
- High electrical resistance
- Long periods of continuous operation
- Loose or faulty wiring
Continuing to run an overheating machine may damage its components and create an unsafe working situation.
Inconsistent Speed or Cutting Out
A machine that slows down, speeds up, or stops unexpectedly may have a loose power connection, unstable contact point, damaged spring, or poorly adjusted contact screw.
Rubber bands that are too tight can also place excess resistance on the needle bar and affect performance.
Coil Tattoo Machine vs Rotary Machine
A coil tattoo machine uses electromagnetic coils and a moving armature bar. A rotary machine uses an electric motor to create needle movement.
The two types offer noticeably different working experiences:
- Sound: Coil machines produce a louder buzz, while rotary machines are generally quieter.
- Weight: Traditional coil machines are usually heavier.
- Vibration: Coil machines often create stronger vibration in the artist’s hand.
- Adjustment: Coil machines allow detailed mechanical tuning.
- Maintenance: Rotary machines often require fewer routine adjustments.
- Needle movement: Coil machines can provide a firm, responsive hit.
- Versatility: Many rotary machines can switch between lining, shading, and color packing without major changes.
The coil tattoo machine vs pen machine comparison is also common. A pen machine has a compact, pen-shaped body with the motor and needle system contained inside it. It can feel familiar and balanced, especially for artists who prefer a drawing-like grip.
A coil machine has a more traditional shape and provides stronger feedback through its sound and movement. Neither style is automatically better. The right choice depends on the artist’s technique, comfort, and preferred working method.
Why Some Tattoo Artists Still Prefer Coil Machines
Modern rotary and pen machines are convenient, quiet, and lightweight, but coil machines continue to have a loyal following.
Many artists prefer them because they offer:
- Strong needle movement
- Clear feedback through sound
- Precise mechanical adjustment
- Reliable performance for bold lining
- Replaceable individual components
- Custom frame, spring, and coil options
- A traditional tattooing experience
Experienced coil users can often hear when a machine is running differently. A slight change in pitch may indicate a loose screw, a contact issue, added resistance, or a change in needle movement.
So, are coil tattoo machines still worth using today? For artists who enjoy mechanical tuning and traditional equipment, the answer is often yes. They remain effective professional tools when built, maintained, and operated correctly.
How to Clean and Maintain a Coil Tattoo Machine
Learning how to clean and maintain a coil tattoo machine is essential because its electrical components cannot simply be soaked or handled like reusable non-electrical tools.
Routine care may include:
- Using suitable disposable barriers during every procedure
- Wiping external surfaces according to the manufacturer’s guidance
- Keeping liquids away from coils and electrical connections
- Inspecting wires, screws, springs, and contact points
- Removing carbon buildup from the contact area when necessary
- Replacing worn grommets and rubber bands
- Checking that frame components remain secure
- Storing the machine in a clean, dry place
Reusable grips, tubes, and other components must be processed according to professional sterilization standards. Surface cleaning alone does not sterilize tattoo equipment.
Artists should follow the machine manufacturer’s instructions, workplace infection-control procedures, and all applicable health regulations.
Choosing the Best Coil Tattoo Machine for Lining and Shading
The best coil tattoo machine for lining and shading is not necessarily the most expensive or powerful option. It is the one that suits the artist’s hand, technique, and intended work.
Before purchasing, consider:
- Whether the machine is designed as a liner, shader, or general-purpose model
- Frame weight and balance
- Coil wrap count
- Spring quality
- Armature bar weight
- Contact screw material
- Overall construction
- Replacement-part availability
- Power supply compatibility
- Manufacturer or builder support
Beginners may benefit from a well-built machine that arrives properly tuned and includes clear setup guidance. A very cheap machine can be tempting, but poor wiring, weak springs, misaligned parts, and low-quality coils may make learning much more difficult.
Artists buying a used coil machine should inspect the frame, coil condition, wiring, springs, contact points, and screw threads. Replacement parts are widely available, but the cost of rebuilding a poorly maintained machine can quickly exceed the original purchase price.
A quality coil tattoo machine should feel balanced, run consistently, respond to careful adjustments, and match the type of tattooing the artist plans to perform.